Table Of Content

Clamp the leg in place and drill through hole you previously made in the leg and through the cornhole board base. You can clamp a board to the outside of the cornhole board base to help prevent tearout. Using a 3/8″ drill bit, drill a hole in each of the legs at this point. If space didn’t allow for building both boards at the same time, repeating these steps is necessary to build the other half of the DIY cornhole set.
Cornhole has competitive leagues all over New England - WCVB Boston
Cornhole has competitive leagues all over New England.
Posted: Tue, 23 Jan 2024 08:00:00 GMT [source]
Unique DIY Bath Bombs to Enjoy Bathtime Like Never Before
If you're making more than a couple sets of boards, the Kreg K4 or better is a big time-saver. Run a bead of wood glue along the top edge of the frame, and lay the 2-foot x 4-foot piece of plywood on top. Then, attach the plywood to the frame with 1 1/4-inch trim screws (approximately 20 on each board). It’s a good idea to predrill the board using the ⅛-inch drill bit to avoid splitting, and ensure that the screw heads are slightly countersunk. If the plywood tops haven’t been cut already, now’s the time. A circular saw is the easiest option, but a bit of patience and the jigsaw will do the trick as well.
Cornhole Bags
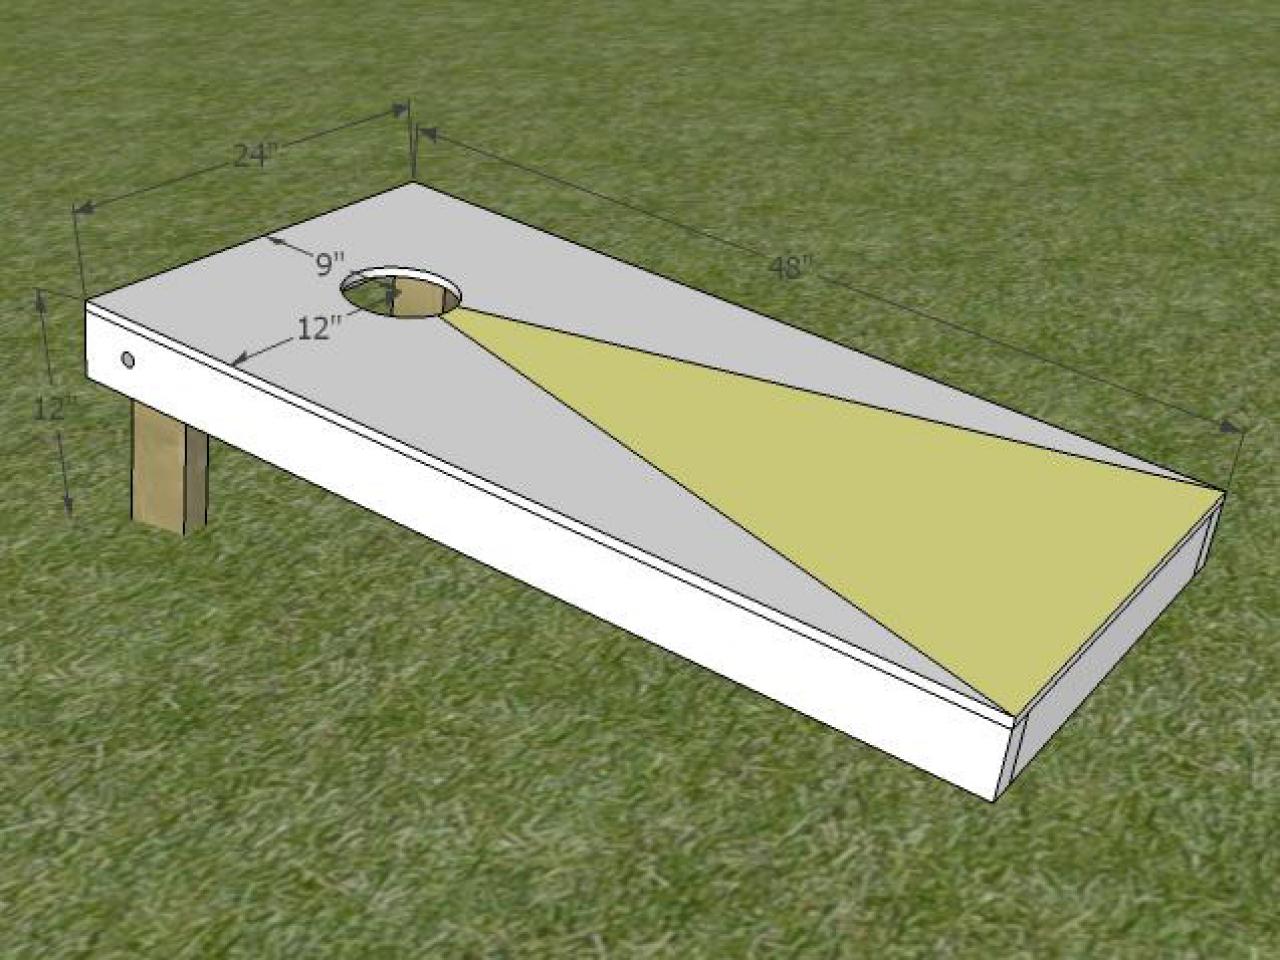
Drill a ⅜” hole on the center mark used for the arc. We have made a set of these boards for ourselves and a couple sets to give away as gifts. This will be a tutorial for building the boards only although we have 3 different sets featured for board design ideas. Remove the legs and insert the carriage bolts through the holes you just drilled. Then thread a washer, the leg, another washer, and screw in place with a wing nut. Drill a hole on one side of each of the circles using your 3/8″ drill bit.
FAQs About DIY Cornhole
The Stagecoach-exclusive Toyota Music Den features up-and-coming artists such as Shaylen and RVSHVD. But I think this design would be easier considering its simplicity. I think it is a cute board that would be enjoyed by all age groups.
All-in-One Cornhole Board Set
Commission Approves 'Cornhole Area' at Park for Eagle Scout Project - New Canaanite
Commission Approves 'Cornhole Area' at Park for Eagle Scout Project.
Posted: Wed, 13 Mar 2024 07:00:00 GMT [source]
Place the longer lengths (the 48-inch 2x4s) parallel to each other. Place the 21-inch boards between these longer boards at their ends. Nothing says family fun like a little bit of friendly competition! The 48×24 inches cornhole sets are made from high-quality hardwood.
Run two screws from the outside of the 48-inch board into the end of the 21-inch board. Cornhole boards are supposed to be 48 inches long by 24 inches wide. Arrange the rectangular frame of your first cornhole board by laying out your 2×4 lumber.
It is made from ¾ inch Baltic Birch plywood with the frame reinforced for added durability. The legs are held nicely with big carriage bolts, and the board is coated with water-based polyurethane to give it a perfect slickness. Attach a pre-cut cornhole plywood top to each frame using 1 1/2-inch wood screws. Smooth plywood is the best choice and will save quite a bit of time when it comes to finishing your game boards. If you prefer to build your own plywood tops, purchase 1/2-inch thick plywood in 2-foot x 4-foot project panels or a 4-foot x 8-foot sheet of plywood. The hole can be cut with a 6-inch hole saw and an electric drill.
Wedding Cornhole Boards
The bags resemble the dressing of Minnie and Mickey. It is also a regulation-size board set and comes with 8 cornhole bags and storage cases. The pattern is scratch-resistant and is printed on both sides for extended durability and protection from environmental elements. And you don’t need to worry about the build material, slickness, and other features.
How To: Frame a Mirror
Attach the frame to the plywood using a pocket hole screw in the one corner. Next do the same on the opposite corner being sure that everything is square. Continue on with each corner and then along the length of the 2x3s clamping each time to insure no movement.
We applied 2 coats on everything, waiting about 5 minutes between coats. Grab both of your 20.75″ boards and mark 4″ and 7″ from each end. Cut your 1×4 boards down according to the cut list below, or grab the printable plans to see the visual cut list that minimizes board waste. I like mine to be hovering dead center over the 6" hole. Drill countersink and attach leg brace with 1 1/4" screws. Mark the legs and inside of the board L/L R/R so you know where they go after you cut them. It's easier if you mark the same side of both legs so you don't have to adjust your mitre saw much (if at all) for the second leg.
Alternatively, you can draw the 6-inch circle with a compass and cut it out with a jigsaw. You can buy a blank, unfinished set and paint your own design! Make sure to use a high gloss paint, so the beanbags will slide easily across the surface. You may want to sand between coats to ensure a perfectly smooth surface. Our 2x4 Touring Pro, Star, and Sig Pro cornhole board models all make for a classic playing experience. This is a pretty simple design for a cornhole set.


No comments:
Post a Comment